Chapter 6: Dice Group Roller
In 2.1: Dice Group, you created a DiceGroup which simulates rolling groups of like sided dice (e.g. 3d6 or 2d4 or 1d20). In this chapter, you will create a simple scene that allows the player to specify a DiceGroup using Dice Notation and roll that DiceGroup. This is the first step in creating a Dice Analyzer.
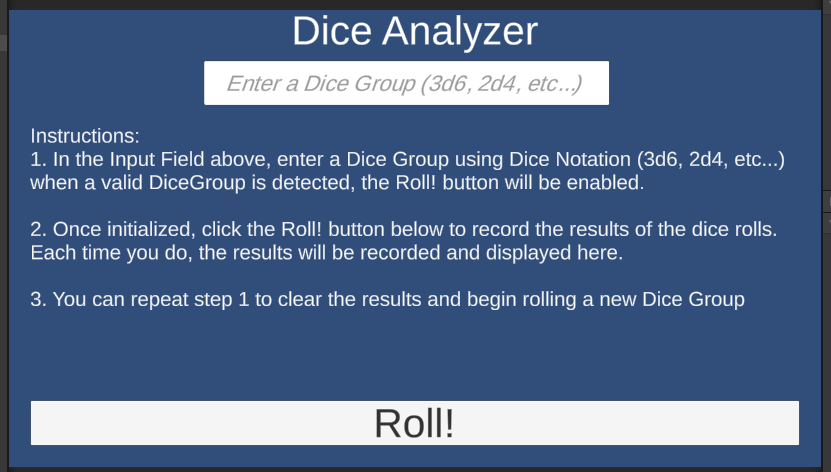
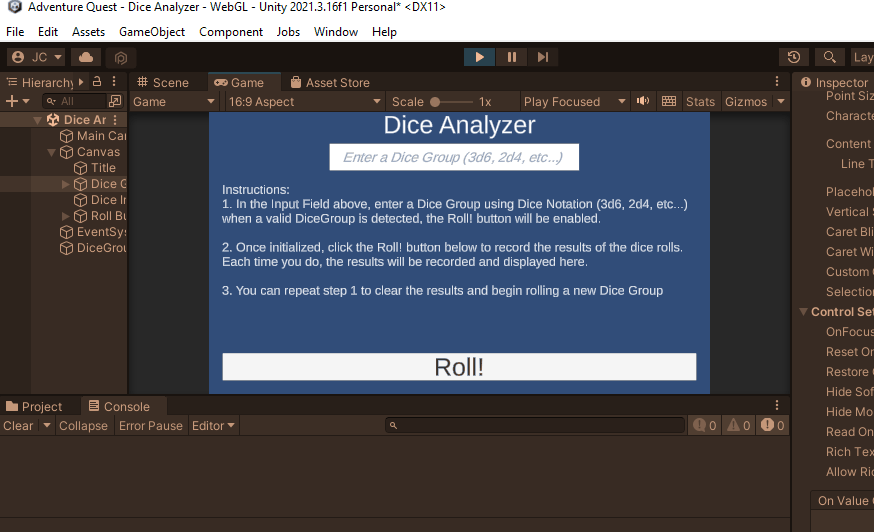
When you have completed this chapter, you will have a scene that is similar to the one below.
Table of contents
- 01. Create a Dice Analyzer Scene
- 02. Add and Configure a Canvas
- Challenge: Add UI Components
- 03. Create a DiceGroupController Script
- 04. Properties and Methods of a DiceGroupController
- 05. On Edit End Event
- Challenge: Connect Dice Info to the OnError event
- 07. Disable the Roll Button
- Challenge: Connect Roll Button to OnDiceGroupInitialized
- Challenge: Connect DiceGroupController to the Roll Button
- Challenge: Connect DiceInfo to the OnRoll event
- 08. DiceGroup.IsParseable
- Challenge: Implement DiceGroup.Parse
- Challenge: Implement DiceGroupController.InitializeDiceGroup
- Challenge: Implement DiceGroupController.Roll
- Good Time to Commit
- What’s Next?
01. Create a Dice Analyzer Scene
- Create a new
Scenein yourScenesfolder and call itDice Analyzer - Open the new
Scene
If you need a refresher on creating and opening a Scene, check out 1.2.01: Create a Scene
02. Add and Configure a Canvas
Before adding UI components to the Scene, it is a good idea to add and configure a Canvas to scale properly with the screen.
Add a Canvas (Click to Expand)
- Right click in the
Hierarchy - Select
UI>Canvas
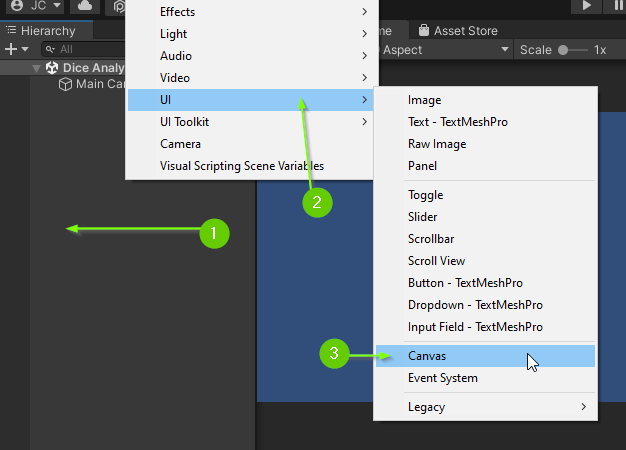
If your Scene did not already have an EventSystem one will automatically be added.
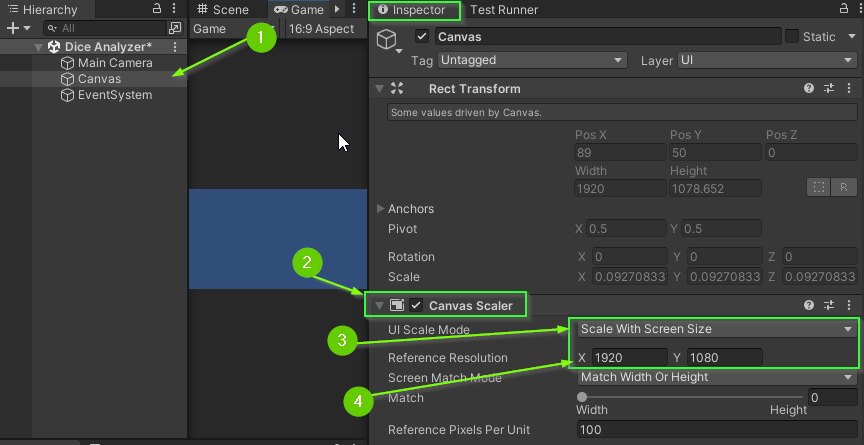
Scale Canvas to 1920x1080 (Click to Expand)
- Select the
Canvasfrom theHierarchy - In the
Inspectorfind theCanvas Scalercomponent - Set the
UI Scale ModetoScale With Screen Size - Set the
Reference Resolutionto1920x1080
Challenge: Add UI Components
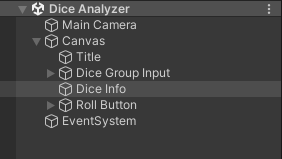
In this Scene, you will add 4 UI components:
- Title: A
Textelement for the Title - Dice Group Input: An
Input Fieldto allow the user to specify theDiceGroupto roll - Dice Info: A
Textelement to display information about the rolls made by theDiceGroup - Roll Button A
Buttonto simulate rolling the currentDiceGroup
Add, rename, and size these 4 components into your Hierarchy. When you’re finished your Canvas should contain at least 4 Game Objects. However, you may find it helpful to add additional Game Objects with Layout components to position your elements the way you would like.
Here is what my Hierarchy and Scene looked like after I had finished:
If you need help adding a specific component to your Scene, click on a section below to see instructions.
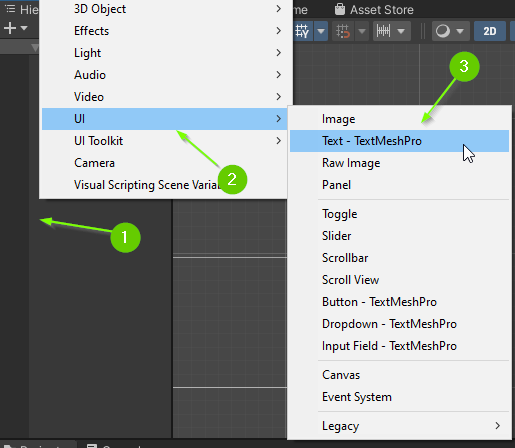
Add Text (Click to Expand)
- Right click in the
Hierarchy - Select
UI>Text - TextMeshPro - Rename the Text component (it is bad practice to leave the default name.)
Modifying the Text
- Select the
TextGame Object from theHierarchy - In the
Inspectorfind theTextMeshPro - Text (UI)component.

You can adjust the text that is displayed, the font, alignment, color, and more from this component.
Adding a Button (Click to Expand)
- Right click in the
Hierarchy - Select
UI>Button - TextMeshPro - Rename the button (it is bad practice to leave the default name.)
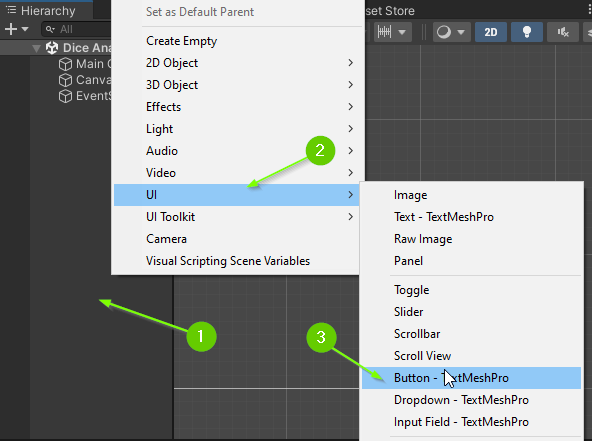
Button’s come with a Text (TMP) child component nested inside. You can modify the text on the button by selecting this child in the Hierarchy and modifying it in the Inspector.
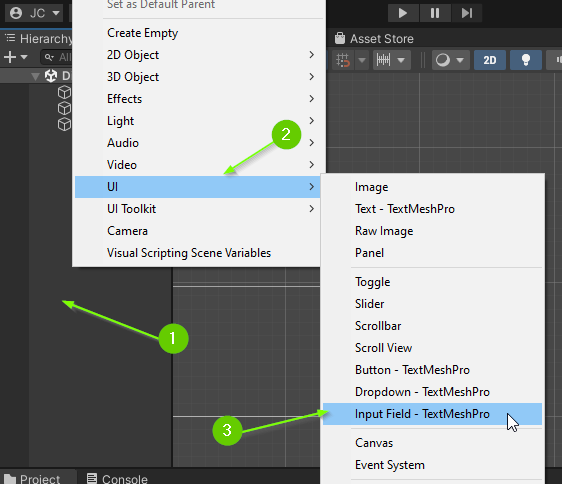
Add an InputField (Click to Expand)
- Right click in the
Hierarchy - Select
UI>Input Field - TextMeshPro - Rename the component (it is bad practice to leave the default name.)
Children of InputField
An InputField comes with a child, TextArea, which has 2 additional children: Placeholder and Text.
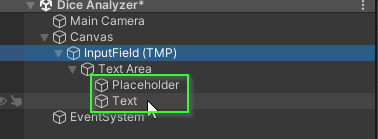
Both the Placeholder and Text children are Text components.
There is RARELY a reason to modify the TextArea child.
Placeholderwill be displayed ifInputFieldis blank. This is typically used to give instructions to the user.Textis automatically updated to match whatever text the user has typed in theInputField.
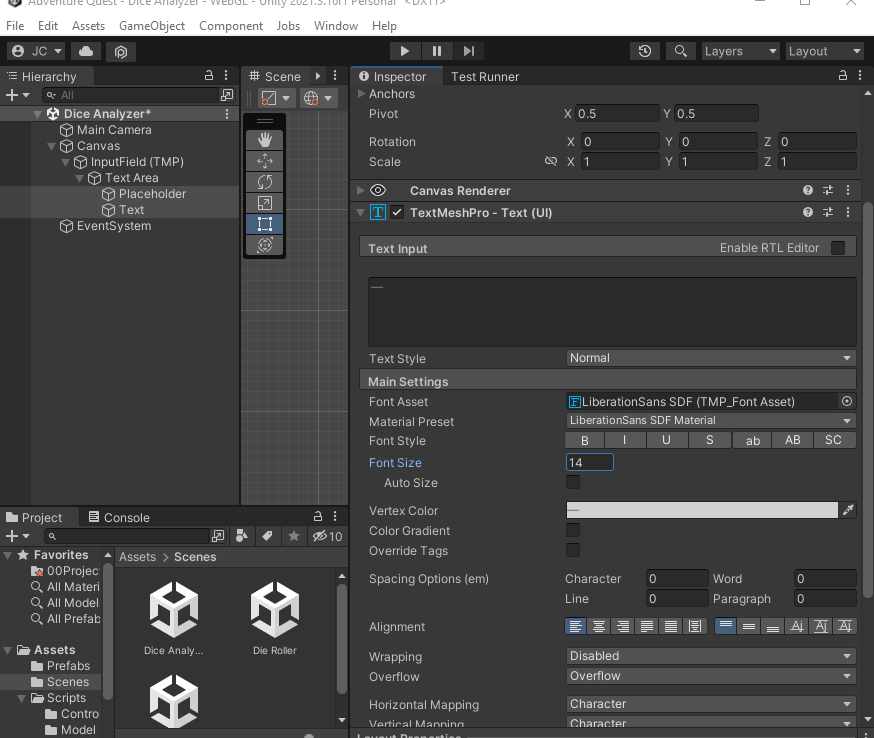
Typically, the styling of these two components are identical (with the Placeholder being a slightly lighter color). If you adjust the styling on one, it does not automatically adjust the styling on the other. However, if you select both (hold shift and click) at the same time, you can modify both in the Inspector at the same time. The image below demonstrates how to do this.
03. Create a DiceGroupController Script
Next, you will create a MonoBehaviour called DiceGroupController. This script will allow us to create a GameObject that controls a DiceGroup as well as provide UnityEvents that other GameObjects can listen to and update themselves accordingly.
- In your
Scripts/Controllerfolder create a script calledDiceGroupController - Open the
DiceGroupControllerscript - It should be apart of the
AdventureQuest.Dicename space - You won’t need an
Update()orStart()method - The script will use the
UnityEngineandUnityEngine.Eventsname spaces
If you’ve set up the class properly, your DiceGroupController.cs file should look like this:
using UnityEngine;
using UnityEngine.Events;

namespace AdventureQuest.Dice
{
    public class DiceGroupController : MonoBehaviour
    {

    }
}
04. Properties and Methods of a DiceGroupController
Think about what purpose a DiceGroupController will serve in this Scene.
- Based on the UI components, what methods will the
DiceGroupControllerneed? - What parameters will those methods accepts?
- How will those parameters be validated?
- What events does a
DiceGroupControllerneed to communicate with the UI components? - What properties and private fields will the
DiceGroupControllerhave to manage the state of aDiceGroup?
Think about the questions above, then expand the section below.
DiceGroup Properties and Methods (Click to Expand)
Just as with the DiceGroup, there are many ways to implement a DiceController. If you chose a different set of properties, I’d love to hear about them.
I won’t try to claim that the properties I’ve chosen here are the best possible set of properties. But, I have attempted to choose properties that expose only the necessary pieces for controlling a DiceGroup.
My proposed class has
- 1 private field to track the
DiceGroup, - 3
UnityEventproperties:OnDiceGroupInitialized,OnRoll, andOnError - 2 methods:
Roll()andInitializeDiceGroup(string diceNotation)
/// <summary>
/// The <see cref="DiceGroup"/> that is being controlled (or null if no _diceGroup has
/// been initialized).
/// </summary>
private DiceGroup _diceGroup;

/// <summary>
/// This event is invoked each time a new <see cref="DiceGroup"/> is
/// initialized.
/// </summary>
[field: SerializeField]
public UnityEvent OnDiceGroupInitialized { get; private set; }

/// <summary>
/// This event is invoked each time a Roll event occurs with the
/// value of that roll.
/// </summary>
[field: SerializeField]
public UnityEvent<string> OnRoll { get; private set; }

/// <summary>
/// This event is invoked if an error occurs reporting a message to be
/// reported to the user.
/// </summary>
[field: SerializeField]
public UnityEvent<string> OnError { get; private set; }

/// <summary>
/// Attempts to initialize a <see cref="DiceGroup"/> using the specified
/// <paramref name="diceNotation"/>. If the <paramref name="diceNotation"/> was
/// not a valid <see cref="DiceGroup"/> an error is generated and no dice is initializd.
/// </summary>
public void InitializeDiceGroup(string diceNotation)
{
    // TODO
}

/// <summary>
/// Rolls the <see cref="DiceGroup"/>. If no <see cref="DiceGroup"/> has been initialized,
/// an error is generated and no dice are rolled.
/// </summary>
public void Roll()
{
    // TODO
}
As always, my main focus is on managing the complexity of the program. To do this, I often focus on reducing mutability.
In this case, I’ve made the DiceGroup _diceGroup a private field that is not exposed. This means that no other objects cannot interact with it directly. Instead, if they would like to roll the DiceGroup, they must do so by calling the DiceGroupController’s Roll() method. This ensures that we can invoke the OnRoll event each time the DiceGroup is rolled.
Similarly, the DiceGroup can only be changed by calling the InitializeDiceGroup method which allows us to validate and report errors if the specified string is not in the correct format.
One could make an argument that the DiceGroup should be exposed as a property using a get and set value and the conversion from a diceNotation string should happen in a separate class. I believe this would be a completely reasonable alternative to what I have proposed here. It should be noted that this would require an additional OnError listener in that class specifically for initialization which isn’t necessarily a negative.
Add a DiceGroupController GameObject to the Scene
With the DiceGroupController script outlined, you’re ready to attach it to a GameObject in the Scene.
- Right click in the
Hierarchy - Select
Create Empty - Rename the new object
DiceGroupController - Select the
DiceGroupControllerobject in theHierarchy - In the
InspectorclickAdd Component - Search for
DiceGroupControllerand add it.
05. On Edit End Event
With the DiceController events in place, it is time to connect it to the UI components.
The Input Field has several events. In our case, we would like to invoke the DiceGroupController’s InitializeDiceGroup method when the user is finished entering a value into the Dice Group Input.
- Select
Dice Group Inputin theHierarchy - In the
Inspectorfind theTextMeshPro - Input Fieldcomponent - Within this component, locate the
On End Edit (String)event- You will likely need to scroll to access it
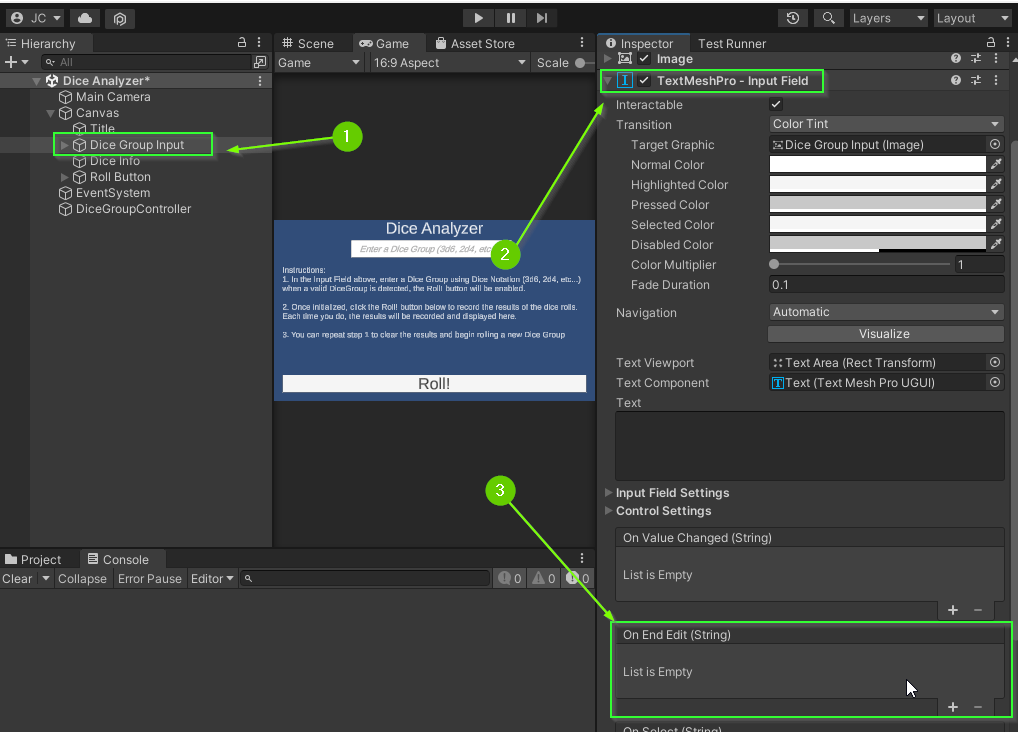
- Click the
+icon to add a listener to the event - Drag
Dice Group Inputinto the listener - Select the
DiceGroupController.InitializeDiceGroupmethod from theFunctiondropdown.
This event triggers after the user enters a value and clicks out of the Input Field.
To test that it is connected, you can update your DiceGroupController.InitializeDiceGroupMethod:
public void InitializeDiceGroup(string diceNotation)
{
    Debug.Log($"The user entered: '{diceNotation}'");
}
Run the Scene, enter a value, and click away from the input box. You should see the string you entered displayed in the console.
Challenge: Connect Dice Info to the OnError event
When the user enters a string that cannot be formatted, you will need to display an error message. To do this, you can connect the Dice Info component to the DiceGroupController’s OnError event.
To test that it is properly connected, update the InitializeDiceGroup method to invoke the OnError event:
public void InitializeDiceGroup(string diceNotation)
{
    OnError.Invoke($"The user entered: '{diceNotation}'");
}
If all went well, your scene should act similar to the one below:
07. Disable the Roll Button
When the user enters a valid DiceGroup value, the Roll Button should be clickable. This means, that before that happens, it should be disabled. This can be done in the Inspector.
- Click the
Roll Buttonin theHierarchy - In the
Inspectorfind theButtoncomponent - Uncheck the
Interactableflag
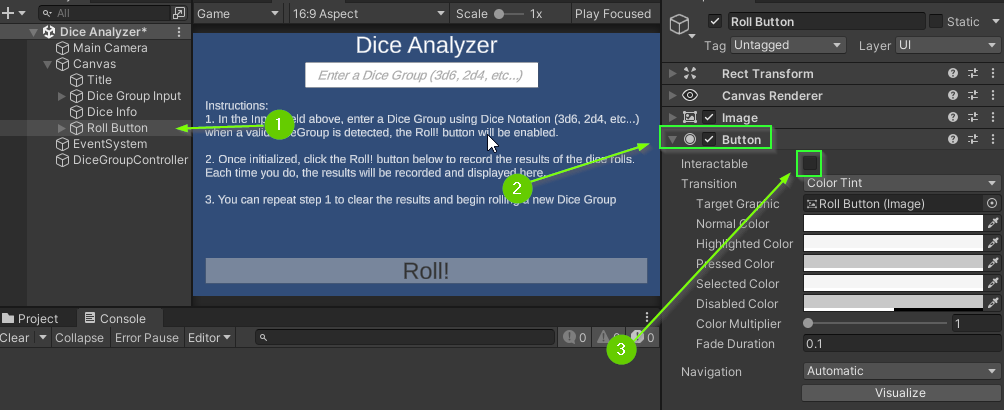
The button in the Scene should appear greyed out. Attempting to click on it will not fire the OnClick event.
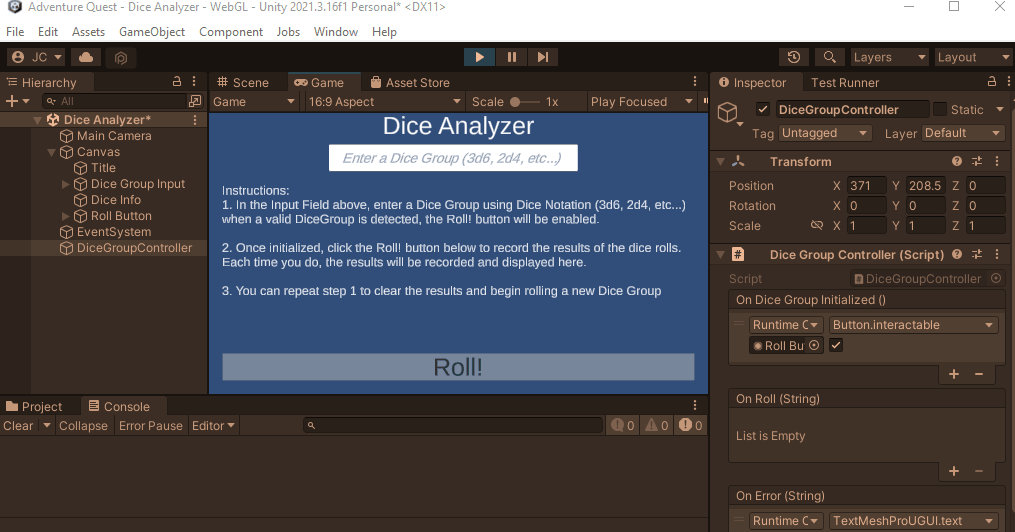
Challenge: Connect Roll Button to OnDiceGroupInitialized
Can you connect the Roll Button to the DiceGroupController’s On Dice Group Initialized event?
To test that it is properly connected, update the InitializeDiceGroup method to invoke the OnDiceGroupInitialized event:
public void InitializeDiceGroup(string diceNotation)
{
    OnError.Invoke($"The user entered: '{diceNotation}'");
    OnDiceGroupInitialized.Invoke();
}
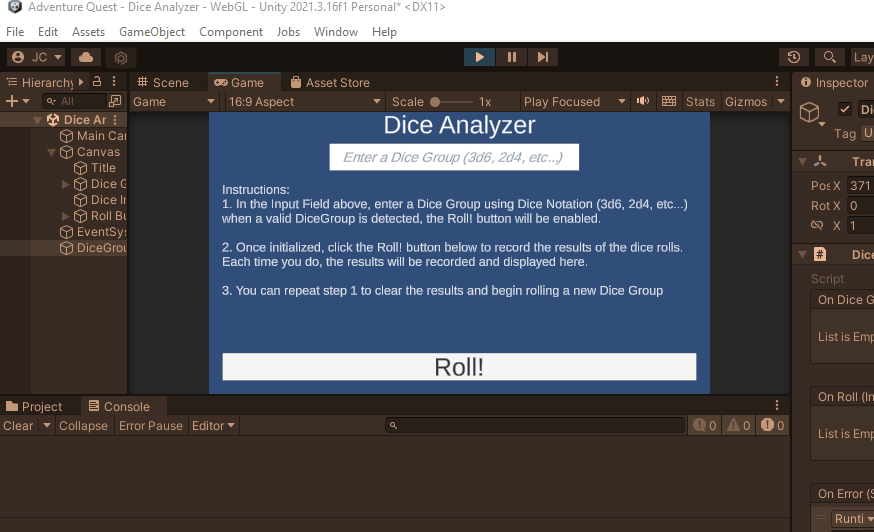
If everything is working, your scene should act similarly to the one below:

Challenge: Connect DiceGroupController to the Roll Button
Clicking the Roll Button should invoke in the DiceGroupController’s Roll() method. Can you add the DiceGroupController to the Roll Button?
To test that it is properly connected, update the Roll() method to display a message to the console.
public void Roll()
{
    Debug.Log("Roll clicked!");
}
If everything is working, you should see a message in your console when you click the roll button.
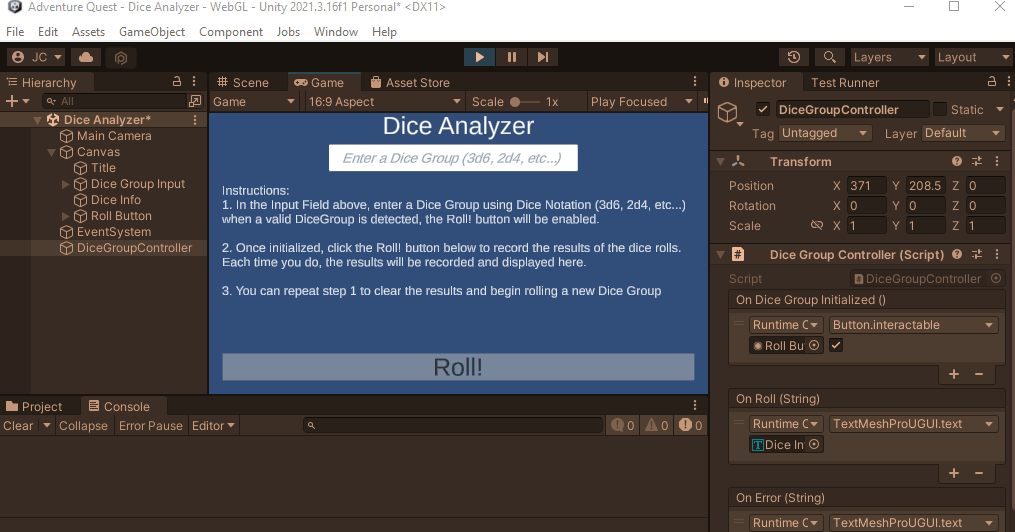
Challenge: Connect DiceInfo to the OnRoll event
When the DiceGroup is rolled, the results should be displayed to the user. Can you connect the Dice Info component to the DiceGroupController’s OnRoll method?
To test that it is properly connected, update the Roll() method to invoke8* the OnRoll **event.
public void Roll()
{
    OnRoll.Invoke("Dice rolled! Result was 42!");
}
If all went well, you should see the message displayed on the screen when the roll button is clicked.
08. DiceGroup.IsParseable
Before implementing the InitializeDiceGroup(string diceNotation) method, it would be convenient to add two static methods to the DiceGroup class to help with parsing the users input into a DiceGroup.
- Add the following static method to your
DiceGroupclass:
DiceGroup.IsParseable (Click to Expand)
/// <summary>
/// Checks if the specified <paramref name="diceNotation"/> string is in
/// a <see cref="DiceGroup"/> format. If it can be parsed, returns true
/// and false otherwise.
/// </summary>
public static bool IsParseable(string diceNotation)
{
    if (diceNotation == null) { return false; }
    string trimmed = diceNotation.Trim();
    string[] tokens = trimmed.Split("d");
    if (tokens.Length != 2) { return false; }
    if (!int.TryParse(tokens[0], out int amount)) { return false; }
    if (amount < 1) { return false; }
    if (!int.TryParse(tokens[1], out int sides)) { return false; }
    if (sides < 2) { return false; }
    return true;
}
Let’s break it down:
- A
nullstring cannot be parsed string trimmed = diceNotation.Trim();- This line of code removes any white space at the end of the incoming string and stores the result in
trimmed. For example:" 2d6 "would become"2d6". This helps reduce any user typos involving white space.
- This line of code removes any white space at the end of the incoming string and stores the result in
string[] tokens = trimmed.Split("d");- This line of code finds each instance of the
dcharacter and “splits” the string into sub-strings. For example,"3d6"becomes{"3", "6"}and"11d22d33d44"becomes{"11", "22", "33", "44}. This allows us to easily examine theamountandsidespart of the incoming string
- This line of code finds each instance of the
if (tokens.Length != 2) { return false; }- This line of code checks that the
tokensarray contains exactly 2 values (amount and sides). If this is not true, the string is not in the correct format and we return false.
- This line of code checks that the
if (!int.TryParse(tokens[0], out int amount)) { return false; }- Extracts the
amountpart fromtokens. Iftokens[0]is not an integer, returns false
- Extracts the
if (amount < 1) { return false; }- Checks if the
amountis at least 1. If it is not, we return false.
- Checks if the
if (!int.TryParse(tokens[1], out int sides)) { return false; }- Extracts the
sidespart fromtokens[1]. Iftokens[1]is not an integer, returns false
- Extracts the
if (sides < 2) { return false; }- Checks if the
sidesis at least 2. If it is not, we return false.
- Checks if the
- At this point, we know the
diceNotationstring is in the correct format
Challenge: Implement DiceGroup.Parse
Next, you must implement the DiceGroup.Parse method:
- Validate that the incoming string is in the correct format. If it is not, throw a
System.FormatExcpetion - Split the string into tokens (use
diceNotation’sSplitmethod) - Parse the tokens into
amountandsides(useint.Parse) - construct and return a
new DiceGroup(amount, sides)
DiceGroup.Parse declaration (Click to Expand)
/// <summary>
/// Given a <paramref name="diceNotation"/> string, parses it and returns a new <see cref="DiceGroup"/>.
/// </summary>
/// <exception cref="System.FormatException">If <paramref name="diceNotation"/> is not a DiceGroup notation.</exception>
public static DiceGroup Parse(string diceNotation)
{
    int amount = int.Parse("1");
    int sides = int.Parse("2");
    return new DiceGroup(amount, sides);
}
This method throws a System.FormatException. This exception is typically thrown when strings cannot be parsed properly. For example int.Parse("banana") would throw this exception.
Additional DiceGroupTest Tests (Click to Expand)
Add the following tests to your DiceGroupTest class to give yourself confidence that your solution is correct.
[Test, Timeout(5000), Description("Tests the Parse method against 3d6 and 1d20")]
public void TestParse()
{
    DiceGroup group3d6 = DiceGroup.Parse("3d6");
    Assert.AreEqual(3, group3d6.Amount);
    Assert.AreEqual(6, group3d6.Sides);
    Assert.AreEqual(3, group3d6.Min);
    Assert.AreEqual(18, group3d6.Max);

    DiceGroup group1d20 = DiceGroup.Parse("1d20");
    Assert.AreEqual(1, group1d20.Amount);
    Assert.AreEqual(20, group1d20.Sides);
    Assert.AreEqual(1, group1d20.Min);
    Assert.AreEqual(20, group1d20.Max);
}

[Test, Timeout(5000), Description("Tests the Parse method throws a format exception on invalid input")]
public void TestParseFormatException()
{
    Assert.Throws<System.FormatException>(() => DiceGroup.Parse("d4"));
    Assert.Throws<System.FormatException>(() => DiceGroup.Parse("d6"));
    Assert.Throws<System.FormatException>(() => DiceGroup.Parse("d8"));
    Assert.Throws<System.FormatException>(() => DiceGroup.Parse("1d-6"));
    Assert.Throws<System.FormatException>(() => DiceGroup.Parse("0d1"));
    Assert.Throws<System.FormatException>(() => DiceGroup.Parse("-1d5"));
    Assert.Throws<System.FormatException>(() => DiceGroup.Parse("banana"));
    Assert.Throws<System.FormatException>(() => DiceGroup.Parse("d5"));
}

[Test, Timeout(5000), Description("Tests the IsParseable method")]
public void TestIsParseable()
{
    Assert.True(DiceGroup.IsParseable("1d4"));
    Assert.True(DiceGroup.IsParseable("3d6"));
    Assert.True(DiceGroup.IsParseable("20d8"));
    Assert.True(DiceGroup.IsParseable("2d12"));
    Assert.True(DiceGroup.IsParseable("7d20"));
    Assert.True(DiceGroup.IsParseable("1d17"));

    Assert.False(DiceGroup.IsParseable("d4"));
    Assert.False(DiceGroup.IsParseable("d6"));
    Assert.False(DiceGroup.IsParseable("d8"));

    Assert.False(DiceGroup.IsParseable("1d-6"));
    Assert.False(DiceGroup.IsParseable("0d1"));
    Assert.False(DiceGroup.IsParseable("-1d5"));
    Assert.False(DiceGroup.IsParseable("banana"));
    Assert.False(DiceGroup.IsParseable("d5"));
}
Challenge: Implement DiceGroupController.InitializeDiceGroup
With these two methods in place, try to implementing the InitializeDiceGroup method.
- Check if
diceNotationcan be parsed using theDiceGroup.IsParseablemethod- If it cannot be parsed, invoke
OnError
- If it cannot be parsed, invoke
- If it can be parsed:
- use
DiceGroup.Parse(diceNotation)to parse aDiceGroupand set_diceGroup - Invoke
OnDiceGroupInitialized
- use
You can test that your method works be entering an invalid input. This should display an error message and the roll button will remain disabled.
Entering a valid input should enable the button.
Preview of Expected Results (Click to Expand)
Solution (Click to Expand)
public void InitializeDiceGroup(string diceNotation)
{
    if (!DiceGroup.IsParseable(diceNotation))
    {
        OnError.Invoke($"Error: \"{diceNotation}\" is not a valid dice group. Expected d.");
        return;
    }
    _diceGroup = DiceGroup.Parse(diceNotation);
    OnDiceGroupInitialized.Invoke();
}
Challenge: Implement DiceGroupController.Roll
Finally, can you implement the Roll() method? Clicking Roll should roll the _diceGroup and invoke the OnRoll method reporting the results.
When you’re finished, your Scene should act similar to the one below:
Good Time to Commit
If you have not already done so, now would be a good time to make a commit and merge. You just finished a feature. More specifically, you implemented a basic Dice Group Roller.
Committing with GitHub Desktop (Click to Expand)
- Ensure the files you would like to commit are checked in the
Changestab.
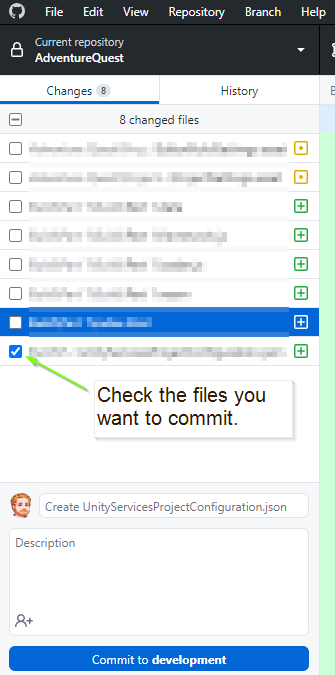
-
Enter a summary for your commit. Think of this as the subject line of an email. It should be SHORT and to the point. Aim to be less than 50 characters. It is good practice to prefix the commit with the type of work that was done. For example:
- A feature:
feat: Implemented Die class - A chore:
chore: Added image assets to project - A bug fix:
fix: Removed off by 1 error - A work in progress:
wip: Partial implementation of DieGroup class
- A feature:
-
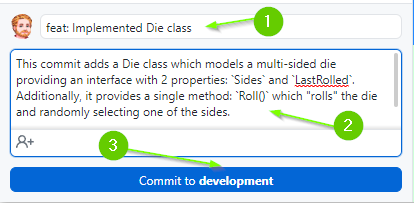
Add a description to your commit. This should provide additional details about what is included in the commit. For example:
This commit adds a Die class which models a multi-sided die providing an
interface with 2 properties: `Sides` and `LastRolled`. Additionally, it provides
a single method: `Roll()` which "rolls" the die and randomly selecting one of
the sides.

Additionally, added unit tests to test the Die class specification.
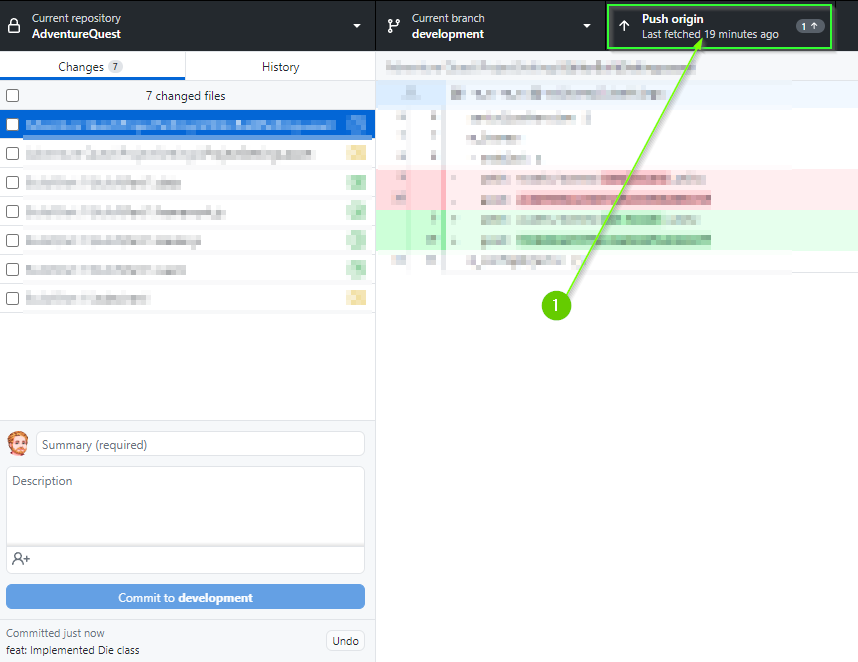
- When you’re ready, click the
Commitbutton
- Lastly, push your commit to GitHub by clicking the
Push originbutton
Merging with GitHub Desktop (Click to Expand)
On a team, you would typically create a Pull Request into your development branch and request a code review. After the review is complete, you would merge your changes into the development branch and delete your feature branch.
If you are working on a project alone, there is no reason to create a Pull Request. Instead, you can merge directly into your development branch.
- Ensure you are on the
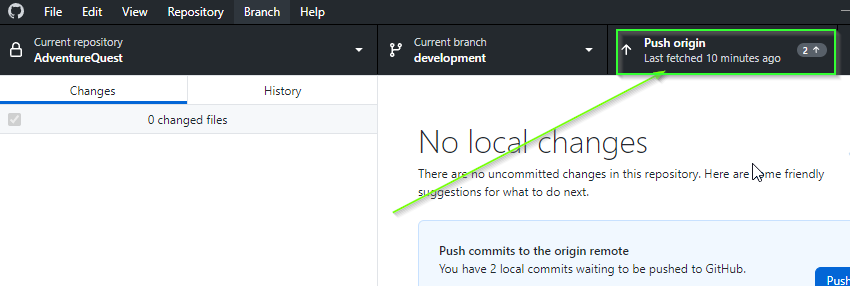
developmentbranch. - Click the
Fetchbutton to ensure you’re synced with GitHub - Ensure that you have
No local changes(you may need to push first)
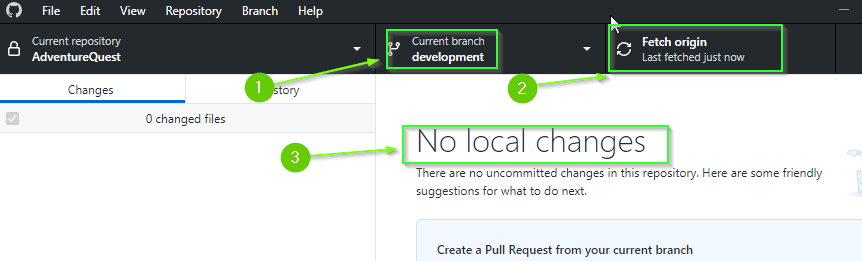
Although it isn’t absolutely necessary for there to be No local changes, you will save yourself a lot of potential pain by ensuring you’re not merging into a “dirty” state.
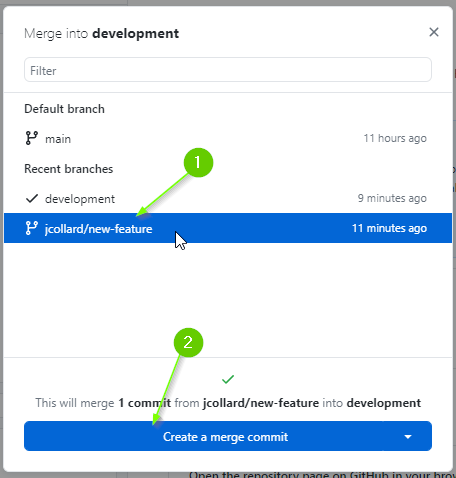
- From the top menu select
Branch>Merge into current branch...
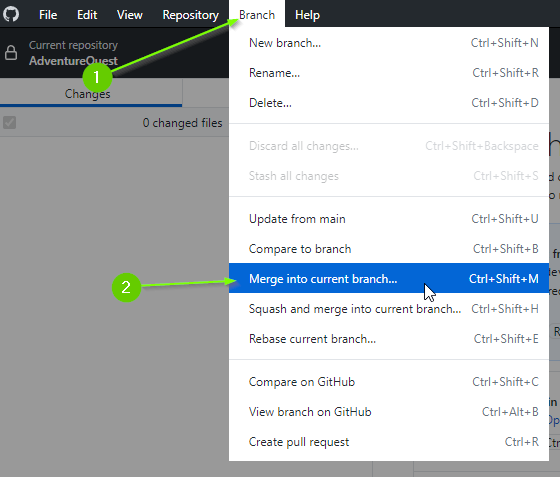
- Select your feature branch
- Click
Create a merge commit
In a team, you will often make a Squash and merge commit which takes all of the commits from your feature branch and reduces it to a single commit. When you have multiple devs, this can help reduce clutter in the commit history.
- Push your changes to GitHub
Finally, we can delete the feature branch.
- Switch to your feature branch.
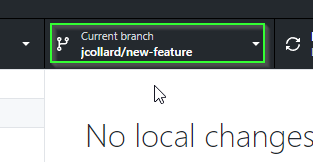
MAKE SURE YOU ARE ON YOUR FEATURE BRANCH. DELETING THE BRANCH IS PERMANENT! DO NOT DELETE THE development BRANCH
- From the top menu select
Branch>Delete
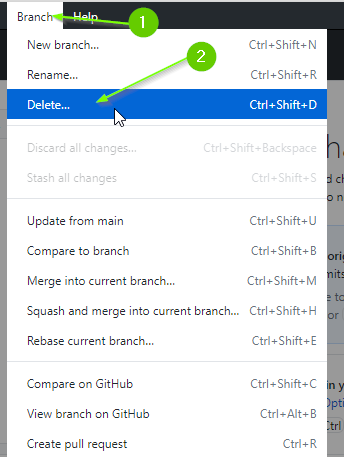
- Ensure you are deleting the correct branch (you can’t undo this!)
- Select,
Yes, delete this branch on the remote(this will delete it on GitHub too) - Click
Delete

- Lastly, if necessary, switch back to your
developmentbranch to continue working.
What’s Next?
Hopefully, you are becoming more comfortable with Unity’s UI elements and connecting them with UnityEvents is beginning to feel easier.
With a DiceGroup class in place, you are ready to move on to [3.0 Character Creator] where you will create a Character Creation Scene.
That said, there is quite a bit more you can do with Dice Notation. If you would like to continue creating additional classes to specify more interesting combinations of dice, you can do so in [2.3 Dice Pool].
Join the Discussion
If you're stuck, have questions, or want to provide feedback, you can do so below. However, I ask that you please refrain from posting complete solutions to any of the challenges.
Before commenting, you will need to authorize giscus. Alternatively, you can add a comment directly on the GitHub Discussion Board.